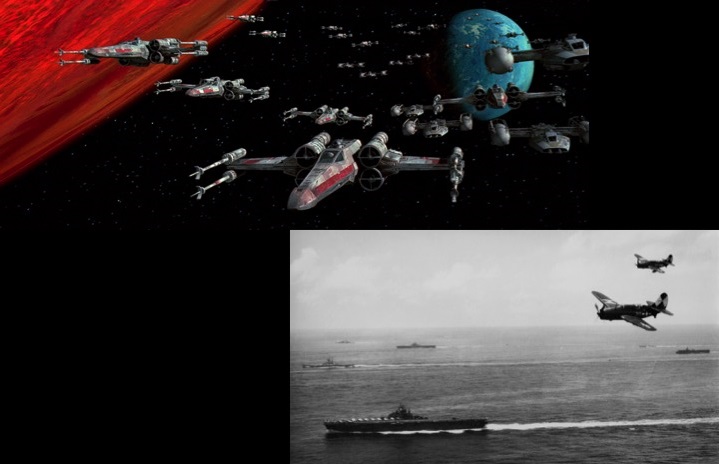
The sight of the ragtag Rebel fleet dropping out of hyperspace into battle is enough to capture the heart of any five- or 55-year-old Star Wars fan. From Rebels to Return of the Jedi, the Alliance’s motley assortment of ships is a striking visual embodiment of their struggle against the Empire. There is real substance behind those amazing on-screen moments, as the Rebel fleet employs tactics that have deep roots in real world conflict.
Lacking the sledgehammer might of the Imperial Navy, the Alliance was forced to develop tactics tailored to their limited resources. Their strategy placed an emphasis on a force built around a backbone of starfighter superiority. The Rebels’ heavy reliance on starfighters echoes the U.S. Navy’s development of aircraft carrier task forces in World War II, which ushered in a new era of combined arms naval warfare.
I. Breaking Tradition
The Rebel Alliance’s starfighter-centric strategy represented a shift in space warfare. At the time of the Alliance’s formation, the prevailing galactic military strategy prized the power of capital ships over snub fighters. This sentiment traces back to the Clone Wars, where space combat was dominated by large-scale engagements between Republic and Separatist capital ships. Although the Republic made strides in developing effective starfighters like the ARC-170 and the V-wing, capital ships remained the central focus of combat and tactics throughout the war. The mentality that pervaded the Clone Wars is exemplified during the Battle of Coruscant, in which a massive number of capital ships slugged it out toe-to-toe.
The trend in favor of large ships mirrors the early twentieth century when floating fortresses reigned supreme. Throughout history navies across the globe pursued more powerful ships, from ships of the line to ironclads. The introduction of the British HMS Dreadnought in 1906 was nothing short of revolutionary. It was the first battleship to combine a massive centrally-linked main gun battery with unprecedented speed. Navies then went all-in on the concept that bigger was better, building increasingly enormous battleships that were designed around their massive guns. Naval combat in World War I was defined by these titans. Military leaders stubbornly stuck to that big-gun mentality on into World War II despite the rapid development of combat aviation.
Similarly, the Galactic Empire saw little need to shift away from the big-ship mentality after the Clone Wars. With the CIS fleet reduced to orbital slag, the Empire stood unmatched across the galaxy. Unlimited resources and a well-established taste for big guns and wedge-shaped behemoths prompted the Empire to stay the course with its fleet structure and strategy. The old mainstay Venator-class Star Destroyers were swept aside in favor of the hulking Imperial I and II-class Destroyers. And if that wasn’t enough wedges and sharp angles, the Empire one-upped itself with the Executor-class Super Star Destroyer—a ship class whose moniker also showcased classic Imperial creativity. Imperial Navy personnel undoubtedly contributed to this sort of tactical inertia. The most senior officers, who formed the backbone of the Empire’s military strategy and training doctrine, were Clone Wars veterans and disciples of the big-gun mentality. Their experiences almost certainly colored the Imperial approach to space warfare, much in the same way that real world senior naval leaders allowed their experiences in World War I to influence strategy over twenty years later in World War II.
In contrast, the Alliance’s extremely limited resources ultimately forced it to forgo the prevailing strategy of the time. With only a handful of precious larger ships such as Phoenix Home, the Alliance simply could not match the firepower of Imperial capital ships. While the United States was far from some ragtag group as World War II erupted in the late 1930s, the surprise attack on Pearl Harbor caused the U.S. Pacific fleet to face tactical footing similar to the Rebellion. The U.S. lost eight battleships and eleven other vessels during that attack, leaving just five aircraft carriers as the only available capital ships in the entire Pacific theater as war erupted at the end of 1941. A paltry five cruisers and 29 destroyers joined them. In comparison, the Japanese Navy had ten battleships, twelve aircraft carriers, 38 cruisers, and 126 destroyers at its disposal. Reinforcements in the form of the USS North Carolina and USS South Dakota battleships would not arrive in the Pacific until several months later in mid-1942. Similarly, with American war production slowly gearing up, the Pacific Fleet would not enjoy the support of new Iowa-class battleships and Essex-class carriers until nearly two years later in 1943. Both the Rebel Alliance and U.S. Pacific Fleet were therefore heavily outnumbered and outgunned. Those circumstances sparked rapid adaptation that prompted a departure from established doctrine.
II. A New Dawn (of Space Tactics)
Out of necessity, the fledgling Rebel Alliance came to rely on a strategy focused around starfighter superiority. While Kuat Drive Yards churned out massive Imperial ships bristling with firepower, Rebel cells used whatever they could get their hands on. Starfighters were easier to acquire than larger vessels, which was a simple fact that heavily shaped Rebel tactics. Likewise, the reality of American losses at Pearl Harbor and slow ship production forced admirals to rapidly adapt and more fully embrace naval airpower. The result was an Alliance fleet with a backbone of starfighters and a Pacific Fleet similarly built around a combined arms strategy that utilized airpower projected from aircraft carrier task forces. The ultimate goal of the strategy was to use fighters to inflict maximum damage while presenting minimal risk to fleet ships.
What the Rebels and Americans lacked in raw firepower they made up for with the offensive and defensive capabilities of fighters. At the core of both Rebel and American strategy were highly capable fighters. The acquisition of the heavily armed X-wing fighter gave the Alliance a superior starfighter that helped even the odds against lethal TIEs. The Americans developed a similar advantage with the rugged F6F Hellcat fighter plane, which turned the tide against Japanese A6M Zeroes. These fighters augmented the heavy striking power of fighters like the Y-wing, B-wing, and real world Avenger and Dauntless bombers, which could deal serious blows to capital ships.
Without capital ships to do the slugging, the job of attacking and defending fell primarily to fighter craft. The U.S. adopted a strategy that surrounded each aircraft carrier with a circle of supporting ships. This offered enhanced protection from enemy fighters. However, it was the carrier’s fighters that provided the most significant advantage. Range was the fighters’ single biggest asset, enabling the task force to strike lethal blows at long distances without requiring larger ships to come in range of blistering enemy fire. Fighters were also used to control and shape enemy fleet movement, which helped friendly ships gain a tactical advantage while simultaneously helping limit enemy angles of attack. Fighters were also used to form a defensive screen that augmented traditional anti-aircraft fire, substantially enhancing fleet defense. The Alliance recognized the same advantages provided by its own starfighters and used them to attack, defend, and shape the battlefield in a very similar manner. This type of combined arms strategy would play a vital role in the Alliance’s most important engagements.
III. Trials by Fire
The Alliance employed the starfighter-centric combined arms stratagem with great effectiveness throughout its struggle against the Empire. The Phoenix cell demonstrated the effectiveness of the approach above the planet Ibaar in the early days of the rebellion. After a relief convoy was devastated under withering fire from Imperial cruisers, the squadron faced a harsh reality. Although the original convoy’s corvettes and A-wings had plenty of speed, they were sorely lacking in firepower. Few of Phoenix Squadron’s large ships could survive a close range engagement with the light cruisers blockading Ibaar. While the squadron might have massed their forces to try and overwhelm the Imperials, they could ill-afford the risk that came along with such a move—doing so would have made Grand Admiral Thrawn’s dreams come true. Instead, the Rebels relied on the enhanced weaponry of the B-wing prototype, solving their problem with the application of a combined arms strategy. Behind the B-wing’s heavy firepower and cover fire from speedy A-wings, the squadron was able to punch a hole in the Imperial blockade with far less risk to its larger ships.
American naval forces adapted to their own strategic disadvantage early in World War II by utilizing similar tactics to push back the Japanese Navy. In May 1942, the Battle of the Coral Sea showcased the potential of naval airpower and a new combined arms strategy. The Coral Sea was not only the first fleet engagement of the war, but it was also the first battle where neither side’s ships fired directly upon one another. U.S. aircraft destroyed the Japanese light carrier Shōhō and damaged two larger fleet carriers. This was the first demonstration that carrier-based air power could sink a large enemy warship in the heat of battle. Heavy damage to the USS Lexington, which had to be scuttled following the battle,and the USS Yorktown would overshadow this strategic success. Nevertheless, the battle helped set the precedent for the U.S. Navy’s continued use of a combined arms strategy throughout the war.
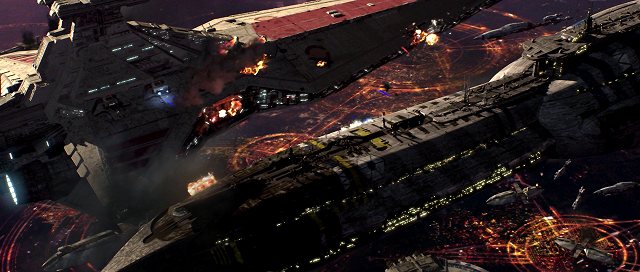
Much like the U.S. Navy implemented lessons learned at the Coral Sea, the Rebel Alliance would build upon lessons from engagements like Ibaar. As the Alliance’s force of starfighters slowly grew, the fleet began to rely on a combined arms strategy that capitalized on its tactical strengths. That strategy proved essential to Rebel success during the Battle of Scarif in Rogue One. Although the powerful MC75 cruiser Profundity and several other large ships augmented the force, the starfighters of Red, Blue, and Green squadrons still formed the foundation of the fleet’s attack and defense. Admiral Raddus recognized that the Rebel vessels were no match for the two Star Destroyers one-on-one, especially at close range. To counter their threat, he used smaller ships led by starfighters to keep the Destroyers hemmed in at sufficient range and thus unable to deliver any crushing blows to the fleet. Taking advantage of this strategy, Gold Squadron’s venerable Y-wings proved that they were worth their weight in galactic credit ingots by disabling one of the Destroyers, paving the way for the shield gate’s destruction. The Alliance’s combined arms strategy was integral in allowing the fleet to hold out against superior Imperial firepower and deliver a major strategic victory.
Despite the relative victory, the arrival of the Devastator at the end of the battle laid bare one of the Alliance’s weakest points. Vader’s Destroyer dropped out of hyperspace right on top of the Rebel fleet, immediately assuming a superior tactical position. The element of surprise put the Rebel force on its heels, unable to maneuver to any sort of effective position. The Devastator quickly took full advantage, cutting through several of the larger Rebel ships like warm butter. The engagement showcased the deadly threat that the Imperial Navy posed. It also highlighted the Rebellion’s sore need for additional capital ships. Without a larger force of them, the Alliance’s strategy was limited. The strategy depends upon a balance of fighters and capital ships, which must operate in a symbiotic relationship of attack, support, and defense. The U.S. Navy faced the same reality in the wake of the Coral Sea. For the United States, salvation came in the form of its tremendous industrial capabilities, which delivered scores of new huge ships and aircraft by mid-1943. For the Rebel Alliance, it was the Mon Calamari and their massive star cruisers.
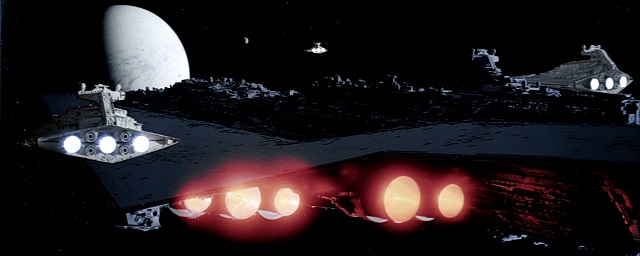
With the addition of Mon Calamari capital ships, the combined arms strategy remained central to the Alliance’s tactics when it attacked the second Death Star. The Alliance’s original plan was to use its starfighters as the primary strike force while the cruisers formed a perimeter. When the Emperor sprung his trap, Rebel starfighters went to work augmenting the fleet’s defense while also engaging the Star Destroyers and their swarm of TIEs. Recognizing that the Imperials seriously outgunned the fleet, Admiral Ackbar kept the fleet’s larger ships out of the Star Destroyers’ range. Spurred by the Death Star’s obliteration of the Liberty and Nautilian cruisers, Ackbar reluctantly agreed to press the attack on the Imperial armada. The combined starfighter force, led by General Calrissian, formed the tip of the spear, inflicting heavy damage against the Destroyers while drawing fire away from the fleet. Rebel capital ships then moved in, augmenting the agile starfighters. While engaging at close range with the combined force was far from an ideal strategy, the deft maneuver caused some useful chaos amongst Imperial forces and helped check the threat posed by the Death Star’s superlaser.
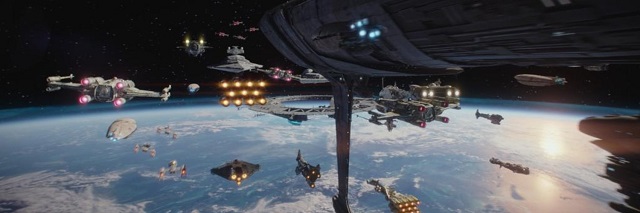
At the climax of the battle, Admiral Ackbar leveraged the combined force to take down the Executor Super Star Destroyer. Concentrated fire from Home One and other Rebel capital ships helped weaken the titan, while starfighters did more surgical work on its defenses, including the bridge deflector shield. In the end it was Arvel Crynyd’s tiny A-wing, not a blast from any capital ship, which finally took down Darth Vader’s Super Star Destroyer—a fitting tribute to the Rebels’ strategy. Following Endor, the Alliance continued to use this strategy to its advantage, destroying or capturing at least six of the remaining twelve Super Star Destroyers in the Imperial fleet.
By late 1943, the U.S. Navy was no scrappy underdog like the Rebel Alliance. Nevertheless, the lessons in combined arms naval warfare from early in the war were firmly rooted by that point. The U.S. Navy’s doctrine slowly shifted with each battle, which helped enshrine aircraft carriers as the key force of the fleet. Naval warfare in the Pacific culminated in the Battle of Leyte Gulf in October 1944, in which the combined arms concept played a critical role. In that battle, American carrier-based aircraft destroyed one of Japan’s two largest battleships, the Musashi. U.S. fighter planes were also instrumental in helping down 600 Japanese aircraft. American battleships, cruisers, and destroyers worked in concert with airpower, pounding Japanese ships with their own artillery, while fighter planes provided a defensive screen. The combined arms strategy delivered a crippling blow to the Japanese, while American aircraft proved their offensive and defensive worth. The battle eliminated Japan’s offensive naval capabilities, with its remaining ships relegated to their bases until the end of the war. Naval warfare was forever changed in the wake of the war, with aircraft carriers and their combat airpower taking center stage.
In the end, Rebel victory in space was not won through the sheer power of capital ship turbolasers. The Rebel strategy of employing superior starfighters in concert with capital ships was instrumental in helping turn the tide against the Empire. American victory in the Pacific could not have been achieved without a similar approach. Much like other historical references scattered throughout the saga, the influence of World War II naval warfare on Star Wars is undeniable. While scenes of space combat in Star Wars will forever make our hearts leap, always remember that there is serious substance, strategy, and history behind what you see on screen (in addition to always remembering brave Arvel Crynyd).

II. A New Dawn (of Space Tactics) <—- I see what you did there!
Crynyd FTW!
Seriously guys, excellent article!
Thanks for the (much forgotten by me) history lesson.
Late in finishing this, but a fantastic article.
Now I want to see the article that explains and describes the combat role of the Gallofree transports in the battles of Scarif and Endor.
Excellent work, Nick’s going to love this one.
Nick helped us edit it. 🙂